
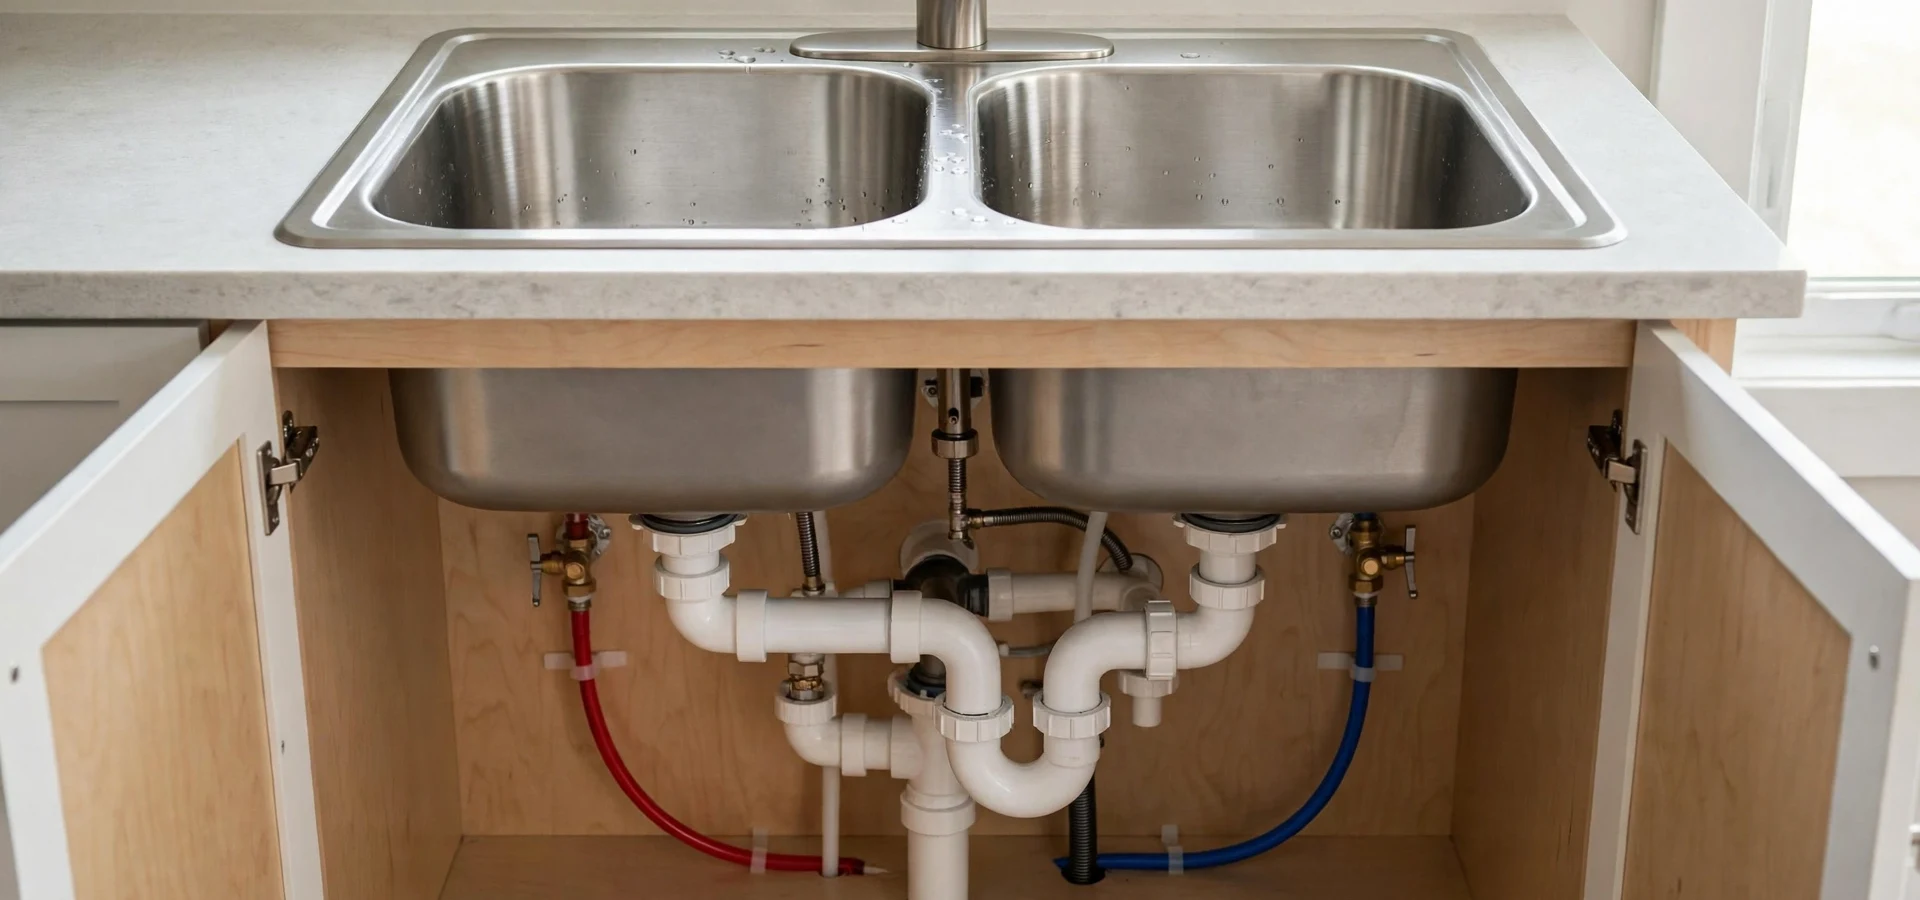
The parts you are connecting
To plumb a kitchen sink, you connect two hot and cold supply lines to the faucet, seal a basket strainer into each bowl, join the tailpieces to a P-trap, and run the trap arm into the wall drain. The trap holds a plug of water that blocks sewer gas. The vent, hidden in the wall, lets air in behind the water so the sink drains smoothly.
Most kitchen sink problems come from one of those three: a drain that does not slope, a trap that is not sealed, or a vent that is blocked. The supply side is simple by comparison.
Parts list before you start
A single missing part sends you back to the store mid-job.
Faucet and supply lines
Braided stainless lines, 3/8 inch, with compression ends that match your stop valves.
Basket strainers
One per bowl. Each needs a rubber gasket, a friction ring, and a lock nut. Plumber's putty or a silicone gasket seals it to the sink.
Tailpieces and a tee
A double sink needs a continuous waste tee with a short crossover tube to join the two bowls.
P-trap kit
1.5-inch pipe in plastic or chrome brass, with slip nuts and washers. Chrome-plated brass looks better if the cabinet has no doors.
Shutoff valves
If the old stops are stuck or weeping, replace them while the water is off for the job.
Installing the sink, supply side first
Do the work in this order, and each connection is easier to reach.
- 1
Mount the faucet and strainers
Set the faucet on the sink deck before you drop the sink in, since the space below is tight. Press plumber's putty under each strainer flange, tighten the lock nut from below, and wipe away the squeeze-out.
- 2
Connect the supply lines
Hot goes left, cold goes right. Hand-tighten the compression nuts at the faucet and at the stop valves, then give each a quarter turn with a wrench. Over-tightening crushes the washer and causes drips.
- 3
Build the drain assembly
Attach the tailpieces to the strainers, join them with the waste tee, then fit the trap so the arm reaches the wall stub with a gentle downward slope. A common rule of thumb is a quarter inch of fall per foot, and the inspector can confirm local limits.
- 4
Test and watch
Open the stops slowly, then fill both bowls and release the water at once. Run a dry paper towel along every joint. Wait fifteen minutes and check again, since slow weeps show up late.
Getting the trap right
The P-trap is a U-shaped bend with a horizontal arm that goes into the wall. The arm slopes slightly toward the drain, never upward. Too steep, and the water siphons out of the trap. Too flat, and solids settle and cause a clog.
Keep the trap close to the wall opening. A long run of horizontal pipe between the trap and the vent invites siphoning, and the code limits that distance, so check with your local inspector before you extend one.
Never use two traps in a row. Double-trapping a kitchen sink traps air between them and makes the drain gurgle and slow.
What you can do and what you should hand off
Replacing a sink in the same location is a manageable job. Rerouting pipes is not.
| Task | Homeowner? | Reason |
|---|---|---|
| Swap faucet or strainer | Yes | Accessible parts, no pipe changes |
| Replace a leaking trap | Yes | Slip nuts and washers |
| Replace stuck stop valves | Often | Shut off the main first if no stop works |
| Move the sink to another wall | No | New drain, vent, and likely a permit |
| Add an island sink | No | Island venting is a specialty piece of work |
| Corroded steel or cast iron drain | No | Fragile pipe can crack when you disturb it |
Connecting the dishwasher and disposal
A dishwasher drain hose should rise into a high loop under the counter or connect to an air gap before it joins the drain. That stops dirty water from flowing back into the machine. If you have a garbage disposal, the dishwasher hose attaches to a nipple on the disposal housing, and the plug inside the nipple must be knocked out first.
If you are adding a disposal, the work has its own steps and electrical safety rules. Our guide to disposal repair and replacement covers those.
Mistakes that show up months later
Using too much plumber's putty on the strainer, or not enough, is the most common source of a slow drip. A thin bead pressed evenly is all you need. Wipe the excess before it cures.
Mixing thread tape with compression fittings is another. Compression joints seal with the washer, not the thread, so tape just prevents a proper seat. Tape belongs on threaded pipe connections only.
Cutting the trap arm too short is a quiet mistake. A pipe that is cut half an inch short cannot be stretched, and a forced fit loads the joint. Dry-fit everything, mark it, and then cut.
Quick leak check on a new kitchen sink
Do this the same day, and again the next morning.
- Dry every joint, then press a dry tissue to each slip nut and look for damp spots.
- Fill both bowls and drain them together. Watch the crossover tube and the tee.
- Run the faucet at full flow and check the supply nuts for drips.
- Run the dishwasher, if connected, and check the hose junction.
- Smell the cabinet. A sewer odor means a dry or leaking trap.
- Check the cabinet floor the next morning for wet wood or a dripped puddle.
When the slow drain is not the sink
If a new trap drains slowly or you hear a gurgle from nearby fixtures, the fault may be farther down the line. Our page on kitchen and branch drain cleaning explains how a cable clears it. Leaks that keep coming back often hide inside the wall, and a leak detection visit can confirm where the water goes.
Covington, KY: what to know before you start
Mainstrasse Village is a 91-acre National Register historic district with Federal, Victorian, Italianate, Queen Anne, Gothic Revival, and Second Empire buildings. Kitchens in buildings that old have often been remodeled many times, so the drain behind the cabinet may be a patchwork of galvanized steel, cast iron, and newer plastic. Expect to find mismatched pipe and plan time to look before you buy any parts.
The Kentucky Division of Plumbing says work covered by concrete, inside walls, or underground must be inspected before it is covered, and it lists moving fixtures among the jobs that need a plumbing permit. Permit rules vary, so ask the Division of Plumbing or the local plumbing inspector. Do not close a wall around a new drain line until the inspection question is settled.
Source type: [W] Wikipedia page for Mainstrasse Village architecture, [DHBC] homeowner packet for permits and pre-cover inspection
Frequently asked questions
Yes. Without a vent, the sink drains slowly and gurgles, and the trap can lose its water seal. The vent is usually inside the wall, which is why moving a sink calls for a plumber.
Keep it as close as practical. Code limits how far a trap can sit from its vent, and the rule depends on pipe size. Ask the local plumbing inspector rather than guessing.
Corrugated flexible pipe collects debris in its ridges and clogs more easily. A smooth-wall trap and arm are a better choice for a kitchen sink where grease is common.
Gurgling suggests air is not reaching the trap, which points to a clogged vent or a blockage in the drain line. Test the drain with a full sink. If other fixtures gurgle too, call a plumber.
It depends on whether the work is a swap or a reroute, the condition of the old pipe, the faucet and fittings you choose, and whether a permit is needed. A licensed plumber gives you a clear price before work starts.
Yes. Our team serves Fort Wright and Park Hills as well as Covington, and same-day appointments are available when the schedule allows. Leaks that cannot wait can go to our 24/7 line.
Often they are. The district's historic buildings were put up in many eras, so a kitchen there may combine old iron or steel with newer plastic. A plumber should look at the pipe behind the cabinet before you commit to a new layout.